This article does not assume that the reader has very professional ROS skills, but a basic understanding is still required. If the reader has never used ROS, the following links should help you get started with learning ROS:
- ROS Tutorials – ROS.org
- This is likely the most authoritative beginner's guide (it's from the official Wiki, after all), but it might not be very user-friendly for beginners in programming or Linux. If you're not familiar with Linux, you might want to check out the tutorial suggested by the Wiki.
- Get Start with ROS Toolbox – Mathworks
- Matlab's documentation is generally of very high quality and serves as excellent learning material, especially considering you might use Simulink. In this case, having direct ROS communication from within Matlab is obviously very convenient.
- ROS_Resources – A collection of ROS teaching materials
- This repo collects some ROS beginner's reference materials, including tutorials from some well-known schools. I haven't gone through them, so I won't make judgments here.
- Professional CMake
- Since ROS's build tools are based on CMake, it doesn't hurt to learn more about it. Of course, it makes little sense to read this book in its entirety - spending a few hours browsing should be sufficient.
This article assumes that readers have fundamental knowledge and experience in Python/C++ programming, as these are the two main languages used in ROS programming. If not, the following resources should help with getting started:
- The Python Tutoral – Python 3.12.0 documentation
- This is the official introductory tutorial for Python. Going through it should equip you with a good understanding of Python.
- Core Python Programming
- This could perhaps be considered a book for intermediate learners.
- C++ Primer 5th edition
- A classic introductory book for C++.
Most of the documentation about the Unitree GO1 robotic dog can be found in the YushuTechUnitreeGo1 repository. This repo has collected almost all related materials for the GO1 robotic dog: you can find relevant PDF files in the GO1's AfterSalesSupport folder. Here are a few of the more important documents:
- Go1 User Manual 1.4, which introduces the composition and usage of the robotic dog.
- Go1 datasheet 3.0, detailing the specifications of the robot's components.
- software_manual, the development handbook for GO1.
- unitree_legged_sdk_manual, the documentation for the software development kit used for controlling the GO1 robot.
All official SDKs or sample codes from unitree can be found at unitreerobotics. The ones most relevant to this article are unitree_ros, unitree_guide, unitree_ros_to_real and unitree_legged_sdk.
I trust that readers should have sufficient financial resources or capabilities to access the above resources (smile).
Though initially, our task only requires setting up the packages and running the simulation, it's crucial to understand the functionalities provided by these packages for any further development. In this section, I will briefly outline the relationship between each package and its documentation for easy reference.
- unitree_legged_sdk: This package offers direct methods to control the GO1 robot dog, with detailed information available in Section 2 of the software_manual.
unitree_ros: This package facilitates the Gazebo simulation environment, allowing control signals to be sent to Gazebo through other ROS nodes to control the robot dog. However,
unitree_rosonly provides low-level control capabilities. This means we must simultaneously coordinate the control of 12 motors on the robot for it to move correctly, necessitating the creation of a comprehensive controller.Here are the ROS simulation packages for Unitree robots, You can load robots and joint controllers in Gazebo, so you can perform low-level control (control the torque, position and angular velocity) of the robot joints. Please be aware that the Gazebo simulation cannot do high-level control, namely walking. Aside from these simulation functions, you can also control your real robots in ROS with the unitree_ros_to_real packages. For real robots, you can do high-level and low-level control using our ROS packages.
unitree_ros_to_real: This package is responsible for converting ROS messages into actual control commands for the real robot. By using it in conjunction with
unitree_ros, we can manipulate the actual robot through ROS messages. Initially, I assumed that there would be a ROS node operating on the GO1 robot dog, but, in reality, that is not the case. The diagram below illustrates the incorrect understanding and the correct interpretation:unitree_ros_to_realtranslates ROS messages into UDP packets, which are then sent to the actual robot. If the ROS control code we are executing is not located on an Ubuntu machine that is directly communicating with the GO1, we require such an Ubuntu system to perform the message translation.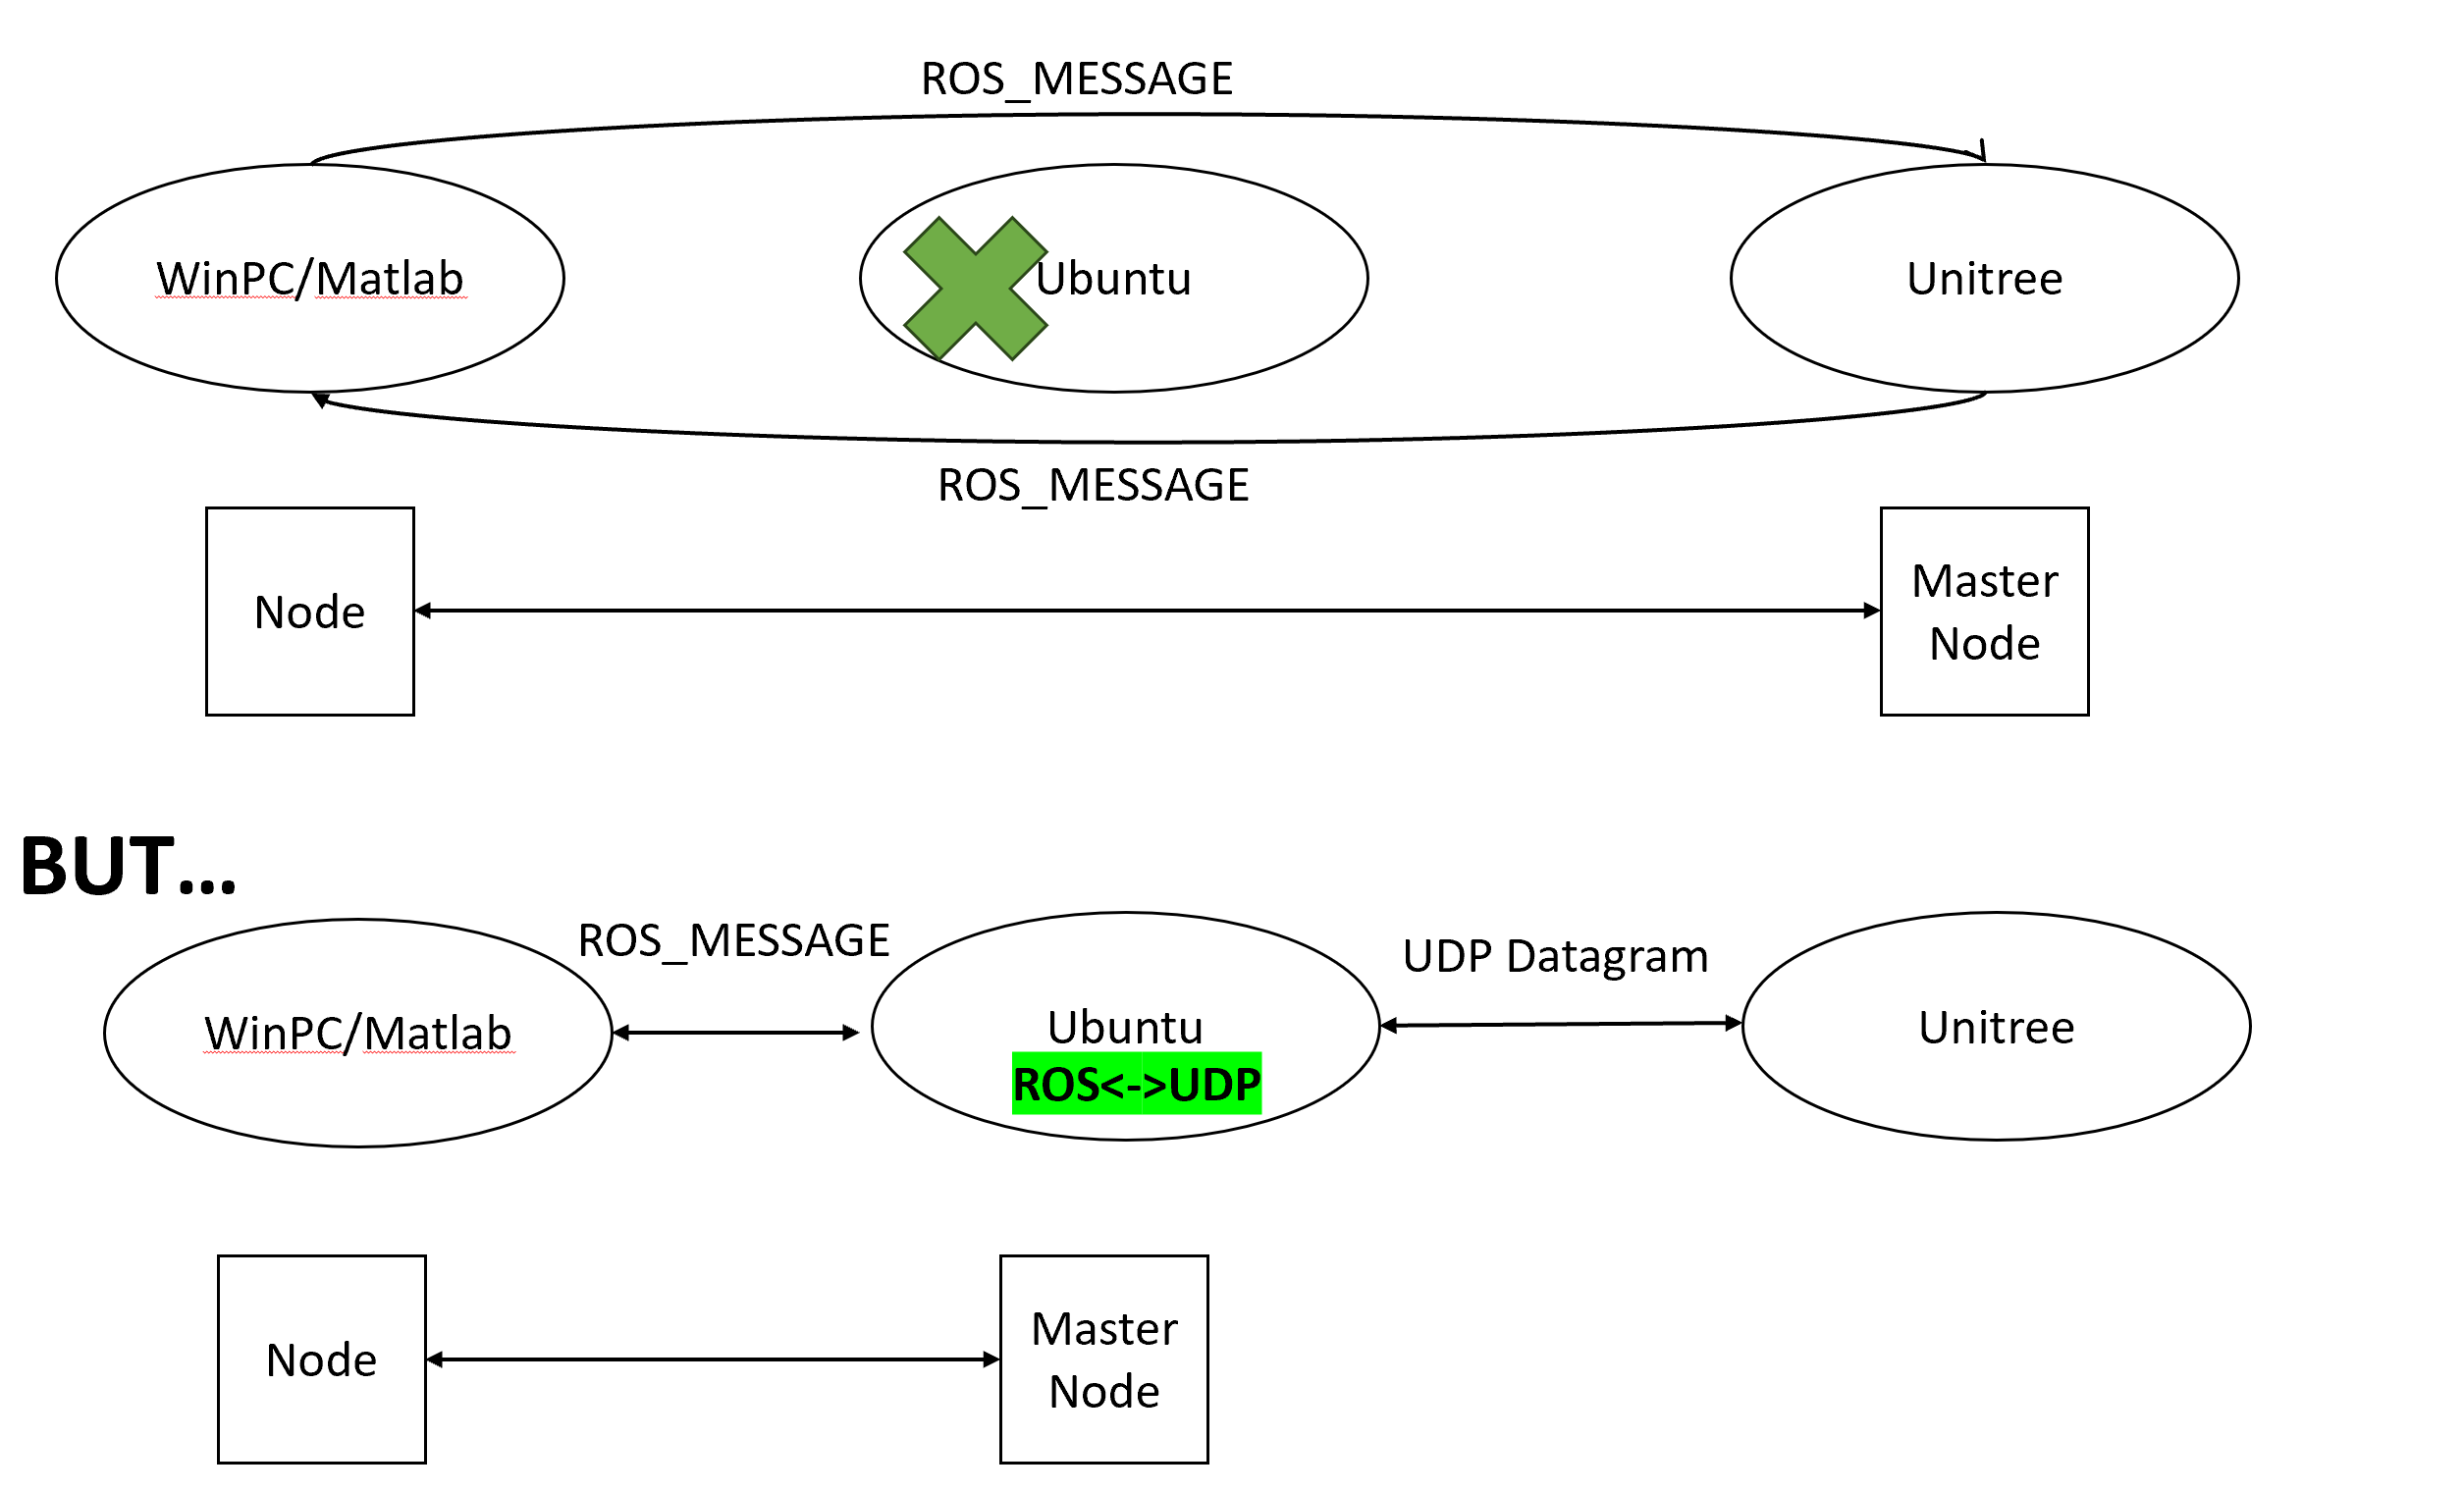
- unitree_guide: Building on the foundation provided by
unitree_ros, this package introduces a set of control algorithms for the GO1, enabling high-level control within the simulation environment. Below is an animated graphic demonstrating the specific control results:
In the video, I am able to control the robot dog's movements forward, backward,
left, and right using the WASD keys on the keyboard, and switch the robot's
motion states with number keys such as 1, 2, 4, etc. You can refer to the
detailed control methods in the usage section.
Next, let's delve into the details of how to install the simulation environment shown in the video on Ubuntu 20.04, as well as how to devise control methods that do not require keyboard input.
To perform simple high-level simulations, we need unitree_guide, which relies
on unitree_ros. Therefore, in this section, I will explain how to install both
unitree_guide and unitree_ros.
To successfully install unitree_ros, I referred to quite a few sources, such
as this one, but they didn't seem to work very well. Now, it seems that the most
viable method is to use the organization method directly on GitHub, which is
what I am going to introduce below.
To download unitree_ros and its dependencies, navigate to the src directory
of your catkin workspace folder and execute the following commands in
sequence. These commands pull the entire project code from GitHub:
git clone https://github.com/unitreerobotics/unitree_ros --depth 1
cd unitree_ros
git submodule update --init --recursive --depth 1
For Ubuntu 20, after installing ROS Noetic, you may also need to install the following components (although some of these might have been included in the Noetic installation):
sudo apt update
sudo apt-get install ros-noetic-controller-interface  \
     ros-noetic-gazebo-ros-control \
     ros-noetic-joint-state-controller \
     ros-noetic-effort-controllers \
     ros-noetic-joint-trajectory-controller \
     liblcm-dev
Next, navigate to the file unitree_gazebo/worlds/starts.world, and at the end
of the document, modify the <uri> to reflect the actual path (specifically,
change the name following 'home' to your own username, and adjust the workspace
directory name if it does not match):
<include>
  <uri>model:///home/unitree/catkin_ws/src/unitree_ros/unitree_gazebo/worlds/building_editor_models/stairs</uri>
</include>
Afterward, return to the catkin workspace directory and execute catkin_make to complete the installation.
To download the unitree_guide in your workspace, execute the following command
in the src directory:
git clone https://github.com/unitreerobotics/unitree_guide --depth 1
If you encounter messages during the compilation process indicating that
move_base_msgs cannot be found, you can download it using the following
command:
sudo apt install ros-noetic-move-base-msgs
sudo apt install ros-noetic-move-base
Currently, unitree_guide offers a very basic GO1 simulation motion controller along with a tutorial. This might be suitable for some practical tasks. After completing the steps above, readers can try the following commands to run the simulation environment and controller:
roslaunch unitree_guide gazeboSim.launch
# another terminal and under catkin_ws
./devel/lib/unitree_guide/junior_ctrl(This section requires some knowledge of C++, at least an understanding of concepts like inheritance and callbacks.)
Here, the "Control Panel" does not refer to the control algorithm but rather
something akin to a joystick or game controller. unitree_guide only provides
keyboard control, so if we want to control the simulated robot's movements by
sending ROS messages from an external process, we need to make some minor
modifications to the original code. In this section, I will introduce a message
Control Panel that I implemented, and incidentally, discuss some details of
'unitree_guide's implementation.
The source code for junior_ctrl is located in the main.cpp within the
unitree_guide/unitree_guide/src directory. It begins by creating an instance
of the IOROS class to initialize the IO interfaces. This instance is then used
as an instantiation parameter for creating an object of the CtrlComponents
class, specifying some simulation parameters, such as the simulation time units,
and so forth. This object is then used as an instantiation parameter to create a
ControlFrame object, which continually calls the run method for ongoing
operation.
Of course, these details are not very important for our purpose; we are just
interested in modifying the control interface. Within the constructor of the
IOROS class, we can find the initialization of the keyboard object:
// unitree_guide/unitree_guide/src/interface/IOROS.cpp

IOROS::IOROS():IOInterface(){
	  std::cout << "The control interface for ROS Gazebo simulation" << std::endl;
	  ros::param::get("/robot_name", _robot_name);
	  std::cout << "robot_name: " << _robot_name << std::endl;

	  // start subscriber
	  initRecv();
	  ros::AsyncSpinner subSpinner(1); // one threads
	  subSpinner.start();
	  usleep(300000);     //wait for subscribers start
	  // initialize publisher
	  initSend();

	  signal(SIGINT, RosShutDown);

	  cmdPanel = new KeyBoard();
}
Since we can't provide a Panel parameter to IOROS to select a custom Panel,
I've defined my own YYROS class here. It will release the created KeyBoard
object and use the constructor parameter as the actual Panel object to be
used:
// new class inherited from IOROS

class YYROS : public IOROS {
public:
	YYROS(CmdPanel *myCmdPanel);
	~YYROS();
};
// use another control pannel instead of Keyboard
YYROS::YYROS(CmdPanel *myCmdPanel):IOROS::IOROS() {
	delete cmdPanel;
	cmdPanel = myCmdPanel;
}
// do nothing
YYROS::~YYROS() {}
Based on the cmdPanel type and the superclass of KeyBoard, it's not
difficult to discern that KeyBoard inherits from the CmdPanel class. Here,
I've reimplemented my own CmdPanel by referencing KeyBoard:
class YYPanel : public CmdPanel {
public:
	YYPanel();
	~YYPanel();
private:
	void* run (void *arg);
	static void* runyy(void *arg);
	pthread_t _tid;
	void checkCmdCallback(const std_msgs::Int32 i);
	void changeValueCallback(const geometry_msgs::Point p);

	// ros specified variable
	// state change listener;
	ros::Subscriber yycmd;
	// velocity change listener;
	ros::Subscriber yyvalue;
};
KeyBoard achieves updates of commands or velocity information by starting a
new thread to receive user inputs and update variables. Here, I adopt the same
approach, using pthread_create to invoke the spin() method in a new thread,
reading information published from other ROS nodes:
YYPanel::YYPanel() {
	userCmd = UserCommand::NONE;
	userValue.setZero();
	ros::NodeHandle n;
	// register message callback functions
	yycmd = n.subscribe("yycmd", 1, &YYPanel::checkCmdCallback, this);
	yyvalue = n.subscribe("yyvalue", 1, &YYPanel::changeValueCallback, this);
	pthread_create(&_tid, NULL, runyy, (void*)this);
}

YYPanel::~YYPanel() {
	pthread_cancel(_tid);
	pthread_join(_tid, NULL);
}

void* YYPanel::runyy(void *arg) {
	((YYPanel*)arg)->run(NULL);
	return NULL;
}

void* YYPanel::run(void *arg) {
	ros::MultiThreadedSpinner spinner(4);
	spinner.spin();
	return NULL;
}
Here, yycmd represents the status values of the robotic dog, while the x and
y components of yyvalue represent the velocity components along the
coordinate directions on a plane, and z denotes the angular velocity around
the z-axis.
Below is the complete code:
yy.cpp
/**********************************************************************
 Copyright (c) 2020-2023, Unitree Robotics.Co.Ltd. All rights reserved.
***********************************************************************/
#include <iostream>
#include <unistd.h>
#include <csignal>
#include <sched.h>

#include "control/ControlFrame.h"
#include "control/CtrlComponents.h"

#include "Gait/WaveGenerator.h"

#include "interface/KeyBoard.h"
#include "interface/IOROS.h"

#include <std_msgs/Int32.h>
#include <geometry_msgs/Point.h>

// new class inherited from IOROS

class YYROS : public IOROS {
public:
	YYROS(CmdPanel *myCmdPanel);
	~YYROS();
};
// use another control pannel instead of Keyboard
YYROS::YYROS(CmdPanel *myCmdPanel):IOROS::IOROS() {
	delete cmdPanel;
	cmdPanel = myCmdPanel;
}
// do nothing
YYROS::~YYROS() {}

class YYPanel : public CmdPanel {
public:
	YYPanel();
	~YYPanel();
private:
	void* run (void *arg);
	static void* runyy(void *arg);
	pthread_t _tid;
	void checkCmdCallback(const std_msgs::Int32 i);
	void changeValueCallback(const geometry_msgs::Point p);

	// ros specified variable
	// state change listener;
	ros::Subscriber yycmd;
	// velocity change listener;
	ros::Subscriber yyvalue;
};

YYPanel::YYPanel() {
	userCmd = UserCommand::NONE;
	userValue.setZero();
	ros::NodeHandle n;
	// register message callback functions
	yycmd = n.subscribe("yycmd", 1, &YYPanel::checkCmdCallback, this);
	yyvalue = n.subscribe("yyvalue", 1, &YYPanel::changeValueCallback, this);
	pthread_create(&_tid, NULL, runyy, (void*)this);
}

YYPanel::~YYPanel() {
	pthread_cancel(_tid);
	pthread_join(_tid, NULL);
}

void* YYPanel::runyy(void *arg) {
	((YYPanel*)arg)->run(NULL);
	return NULL;
}

void* YYPanel::run(void *arg) {
	ros::MultiThreadedSpinner spinner(4);
	spinner.spin();
	return NULL;
}

void YYPanel::checkCmdCallback(std_msgs::Int32 i) {
	ROS_INFO("%d", i.data);
	//*
	UserCommand tmp;
	switch (i.data){
	case 1:
		tmp = UserCommand::L2_B;
		break;
	case 2:
		tmp = UserCommand::L2_A;
		break;
	case 3:
		tmp = UserCommand::L2_X;
		break;
	case 4:
		tmp = UserCommand::START;
		break;
#ifdef COMPILE_WITH_MOVE_BASE
	case 5:
		tmp = UserCommand::L2_Y;
		break;
#endif  // COMPILE_WITH_MOVE_BASE
	case 6:
		tmp = UserCommand::L1_X;
		break;
	case 9:
		tmp = UserCommand::L1_A;
		break;
	case 8:
		tmp = UserCommand::L1_Y;
		break;
	case 0:
		userValue.setZero();
		tmp = UserCommand::NONE;
		break;
	default:
		tmp = UserCommand::NONE;
		break;
	}
	userCmd = tmp;
	//*/
}

void YYPanel::changeValueCallback(const geometry_msgs::Point p)
{
	//ROS_INFO("speed: %f, %f, %f", p.x, p.y, p.z);
	// (x, y, z)
	// x for x-axis speed, y for y-axis speed, z for rotate speed
	//*
	  userValue.lx = p.x;
	  userValue.ly = p.y;
	  userValue.rx = p.z;
	//*/
}

/*
 */

bool running = true;

// over watch the ctrl+c command
void ShutDown(int sig)
{
	std::cout << "stop the controller" << std::endl;
	running = false;
}

int main(int argc, char **argv)
{
	/* set the print format */
	std::cout << std::fixed << std::setprecision(3);

	ros::init(argc, argv, "unitree_gazebo_servo");

	IOInterface *ioInter;
	CtrlPlatform ctrlPlat;

	ioInter = new YYROS(new YYPanel());
	ctrlPlat = CtrlPlatform::GAZEBO;

	CtrlComponents *ctrlComp = new CtrlComponents(ioInter);
	ctrlComp->ctrlPlatform = ctrlPlat;
	ctrlComp->dt = 0.002; // run at 500hz
	ctrlComp->running = &running;

	ctrlComp->robotModel = new Go1Robot();

	ctrlComp->waveGen = new WaveGenerator(0.45, 0.5, Vec4(0, 0.5, 0.5, 0)); // Trot
	// ctrlComp->waveGen = new WaveGenerator(1.1, 0.75, Vec4(0, 0.25, 0.5, 0.75));  //Crawl, only for sim
	//ctrlComp->waveGen = new WaveGenerator(0.4, 0.6, Vec4(0, 0.5, 0.5, 0));  //Walking Trot, only for sim
	//ctrlComp->waveGen = new WaveGenerator(0.4, 0.35, Vec4(0, 0.5, 0.5, 0));  //Running Trot, only for sim
	// ctrlComp->waveGen = new WaveGenerator(0.4, 0.7, Vec4(0, 0, 0, 0));  //Pronk, only for sim

	ctrlComp->geneObj();

	ControlFrame ctrlFrame(ctrlComp);

	// deal with Ctrl+C
	signal(SIGINT, ShutDown);

	while (running)
	{
		ctrlFrame.run();
	}

	delete ctrlComp;
	return 0;
}
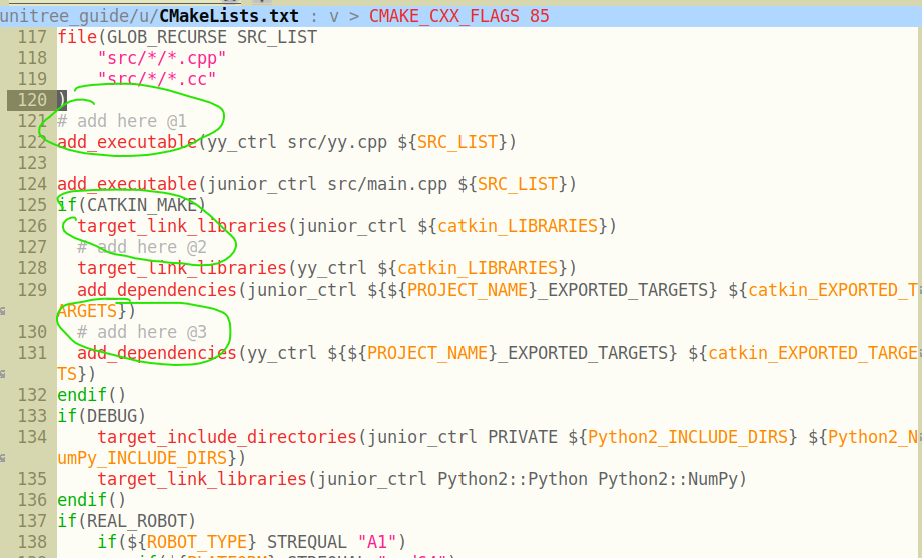
Place yy.cpp in the same directory as main.cpp, and modify the
CMakeLists.txt in the /unitree_guide/unitree_guide directory at the position
shown in the picture below. After that, re-run catkin_make, and you'll have a
simulation controller that can accept ROS message controls:
Readers can write their own ROS nodes to send data to yycmd and
yyvalue. After starting yy_ctrl (./devel/lib/unitree_guide/yy_ctrl), the
messages they send will be transmitted to the simulation environment. Below is
the code I used during testing:
import rospy
from geometry_msgs.msg import Point

pub = rospy.Publisher('yyvalue', Point, queue_size=10)
rospy.init_node('yytry', anonymous=True)
rate = rospy.Rate(10)

i = 0.0

while not rospy.is_shutdown():
    pub.publish( Point(x=i, y=i, z=i))
    rospy.loginfo(i)
    i = i + 1
    rate.sleep()
import rospy
from std_msgs.msg import Int32
pub = rospy.Publisher('yycmd', Int32, queue_size=10)
rospy.init_node('yytry', anonymous=True)
rate = rospy.Rate(10)
i = 0
while not rospy.is_shutdown():
pub.publish(i)
rospy.loginfo(i)
i = i + 1
rate.sleep()Lastly, it's important to note that you should try to avoid running simulations in a virtual machine environment. Due to performance constraints, there can be a significant deviation from real-time, potentially leading to unexpected results.
As previously mentioned, we can achieve the conversion of ROS messages into UDP
data through unitree_ros_to_real. Just as I was preparing to delve into this, a
colleague discovered a package that directly utilizes the SDK:
go1-math-motion. Here's a demonstration video: Go1 High Level Control with ROS
and Turtlesim. After completing the package installation and compilation, we
simply need to launch the twist_sub node and send geometry_msgs/Twist type
messages to /cmd_vel to control the actual GO1 robot dog's movements.
As for establishing a network connection between your Ubuntu machine and GO1,
you might consider using an Ethernet cable (preferably a longer one) or
connecting to the router on the GO1 (the SSID isn't very clear, but it
definitely includes unitree). The router's password is eight 8's:
88888888. If you prefer a wired connection, you can use the following command:
sudo ifconfig eth0 down # eth0 is your PC Ethernet port
sudo ifconfig eth0 192.168.123.162/24
sudo ifconfig eth0 up
ping 192.168.123.161
The eth0 mentioned is the name of the wired network card on your machine.
Once all connections are established, we can control the movements of GO1
through code, similar to circle_walk.cpp in the go1-math-motion package:
#include "ros/ros.h"
#include <geometry_msgs/Twist.h>

int main(int argc, char **argv)
{
	  ros::init(argc, argv, "circle_walk");

	  ros::NodeHandle nh;

	  ros::Rate loop_rate(500);

	  ros::Publisher pub = nh.advertise<geometry_msgs::Twist>("/cmd_vel", 1);

	  geometry_msgs::Twist twist;

	  while (ros::ok())
	  {
		  twist.linear.x = 0.5; // radius (meters)
		  twist.linear.y = 0;
		  twist.linear.z = 0;
		  twist.angular.x = 0;
		  twist.angular.y = 0;
		  twist.angular.z = 1; // direction (positive = left, negative = right)

		  pub.publish(twist);

		  ros::spinOnce();
		  loop_rate.sleep();
	  }

	  return 0;
}Through this article, we have accomplished the setup of the GO1 simulation environment on Ubuntu 20.04 and implemented actual control. But what if our system is Ubuntu 22.04 or another Linux system not officially supported by ROS Noetic? In such cases, we might need to compile ROS and other components from source.
Naturally, the Wiki provides detailed steps on how to compile ROS from source, but it's not directly applicable to Ubuntu 22.04, requiring some modifications. The repository build_ros_noetic_on_jammy offers the modified installation scripts. I am providing them directly here to prevent any issues in case the repository gets deleted in the future:
build_noetic_on_jammy.sh
#!/bin/bash

rm -rf ~/ros_catkin_ws

ROS_DISTRO=noetic

sudo apt-get install python3-rosdep python3-rosinstall-generator python3-vcstools python3-vcstool build-essential
sudo rosdep init
rosdep update

mkdir ~/ros_catkin_ws
cd ~/ros_catkin_ws
rosinstall_generator desktop --rosdistro noetic --deps --tar > noetic-desktop.rosinstall
mkdir ./src
vcs import --input noetic-desktop.rosinstall ./src

#hddtemp disable patch
sed -i -e s/"<run_depend>hddtemp<\/run_depend>"/"<\!-- <run_depend>hddtemp<\/run_depend> -->"/g ./src/diagnostics/diagnostic_common_diagnostics/package.xml

rosdep install --from-paths ./src --ignore-packages-from-source --rosdistro noetic -y

sed -i -e s/"COMPILER_SUPPORTS_CXX11"/"COMPILER_SUPPORTS_CXX17"/g ./src/geometry/tf/CMakeLists.txt
sed -i -e s/"c++11"/"c++17"/g ./src/geometry/tf/CMakeLists.txt
sed -i -e s/"CMAKE_CXX_STANDARD 14"/"CMAKE_CXX_STANDARD 17"/g ./src/kdl_parser/kdl_parser/CMakeLists.txt
sed -i -e s/"CMAKE_CXX_STANDARD 11"/"CMAKE_CXX_STANDARD 17"/g ./src/laser_geometry/CMakeLists.txt
sed -i -e s/"c++11"/"c++17"/g ./src/resource_retriever/CMakeLists.txt
sed -i -e s/"COMPILER_SUPPORTS_CXX11"/"COMPILER_SUPPORTS_CXX17"/g ./src/robot_state_publisher/CMakeLists.txt
sed -i -e s/"c++11"/"c++17"/g ./src/robot_state_publisher/CMakeLists.txt
sed -i -e s/"c++11"/"c++17"/g ./src/rqt_image_view/CMakeLists.txt
sed -i -e s/"CMAKE_CXX_STANDARD 14"/"CMAKE_CXX_STANDARD 17"/g ./src/urdf/urdf/CMakeLists.txt

rm -rf ./src/rosconsole
cd src
git clone https://github.com/tatsuyai713/rosconsole
cd ..

./src/catkin/bin/catkin_make_isolated --install -DCMAKE_BUILD_TYPE=Release
As for the reason behind the necessity to change the compilation standard from 11 to 14 or 17, you can refer to this issue for context.
To conclude this article, I'd like to recommend a repository: ros_unitree. I stumbled upon this gem on Reddit.
If you encounter any issues with the content presented in this article within the specified environments, your feedback would be highly appreciated.