整个 ox-html.el 文件接近 4000 行,我不太可能有精力照着 org-mode 的后端文档重新写一个出来,不过在它的基础上做一些改变还是做得到的。org 有编写导出后端的文档,不过我们没必要全看就是了。
ox-html 的第一页是对整个 HTML 后端的定义,整体上大概是这几部分:
后端名,这里就是
html(org-export-define-backend 'html ...转换表,将元素交给指定的转换函数处理:
'((bold . org-html-bold)
  (center-block . org-html-center-block)
  (clock . org-html-clock)
  (code . org-html-code)
  (drawer . org-html-drawer)
  (dynamic-block . org-html-dynamic-block)
  (entity . org-html-entity)
  ...)
过滤器表
:filter-alist:filters-alist '((:filter-options . org-html-infojs-install-script) (:filter-parse-tree . org-html-image-link-filter) (:filter-final-output . org-html-final-function))菜单选项
:menu-entry,在C-c C-e调出的导出分派器中的选项:menu-entry '(?h "Export to HTML" ((?H "As HTML buffer" org-html-export-as-html) (?h "As HTML file" org-html-export-to-html) (?o "As HTML file and open" (lambda (a s v b) (if a (org-html-export-to-html t s v b) (org-open-file (org-html-export-to-html nil s v b)))))))选项表,列出可用于导出的所有选项
:options-alist
'((:html-doctype "HTML_DOCTYPE" nil org-html-doctype)
  (:html-container "HTML_CONTAINER" nil org-html-container-element)
  (:html-content-class "HTML_CONTENT_CLASS" nil org-html-content-class)
  (:description "DESCRIPTION" nil nil newline)
  (:keywords "KEYWORDS" nil nil space)
  (:html-html5-fancy nil "html5-fancy" org-html-html5-fancy)
  ...)
如果你稍微研究过 org 的 HTML 导出的话,你就应该会对菜单选项和选项表很熟悉,比如 html5-fancy , HTML_DOCTYPE 等等。如果之后有时间的话我会介绍 filter ,下面让我们先来看看如何使用 ox-html 提供的自定义入口。
原本我以为我需要替换掉几个函数或者使用 advice 才能达到我修改输出的目的,不过 ox-html 的作者显然是考虑到了使用者根据需要修改默认输出的需要,他在 ox-html.el 中定义了一系列的 custom 变量来供我们修改,这样一来可以省去很多麻烦。
我们还是结合具体的导出结果来分析各个 custom 变量值的作用,这里我只介绍一些比较容易折腾的选项,想要完整地了解整个设定变量集合还是得自己根据需求读一读 ox-html.el。这里介绍的不一定都是使用 defcustom 定义的变量,也有一些用于输出的常量:
org-html-style-default,默认插入到生成的 HTML 中的 CSS,比较简陋,但也不是不能用,至少是做到了内容居中org-html-text-markup-alist,定义从 org 富文本标记到 HTML tag 的映射,比如用于*加重*映射到<b>%s</b>,其中的%s是加重内容,下面出现的各种%s都是输出标记中的内容根据默认的映射,斜体
/映射到<i>,代码=映射到<code>,下划线_映射到<span>,删除线+映射到<del>。有意思的是~和=都映射到<code>,这样如果代码中出现了~或=我们可以使用另一种替代,不过这是在默认情况下:(defcustom org-html-text-markup-alist '((bold . "<b>%s</b>") (code . "<code>%s</code>") (italic . "<i>%s</i>") (strike-through . "<del>%s</del>") (underline . "<span class=\"underline\">%s</span>") (verbatim . "<code>%s</code>"))org-html-toplevel-hlevel,org 中的一级标题在 HTML 中的级数,默认为 2这也就是说在 org 中的一级标题将被映射为
<h2>,根据文档的说明,这是因为 ox-html 使用<h1>来表示标题。这样一来 org 中的一级标题将使用outline-2,section-number-2和outline-text-2作为 CSS。关于 CSS 的问题我将在随后的文章中进行介绍。org-html-inline-image-rules,org 将内联链接识别为图片的规则对于文件,该规则包括
jpeg,jpg,png,gif,svg,webp,如果使用了其他格式的文件,比如apng,我们可以考虑将.apng添加到表中,再调用regexp-opt生成匹配正则。(defcustom org-html-inline-image-rules `(("file" . ,(regexp-opt '(".jpeg" ".jpg" ".png" ".gif" ".svg" ".webp"))) ("http" . ,(regexp-opt '(".jpeg" ".jpg" ".png" ".gif" ".svg" ".webp"))) ("https" . ,(regexp-opt '(".jpeg" ".jpg" ".png" ".gif" ".svg" ".webp"))))org-html-table-default-attributes,关于表格属性设置的 plist,在 HTML5 中不使用关于表格的选项有很多,可以参考 org 文档的 13.9.8 一节,我在后续的文章中介绍这些选项的设定。
org-html-coding-system,HTML 导出的编码,默认为utf-8org-html-content-class,HTML 文章内容div块的 CSS 类名,默认为content可通过在 buffer 中指定
HTML_CONTENT_CLASS来修改,也许后续我会将这个div块改为main块。org-html-divs,指定对 preamble,content 和 postamble 使用什么块级元素,默认都是div上面我提到我会将 content 的
div改为main或其他,我们直接修改这个变量即可,顺便我们可以将 preamble 改为header,将 postamble 改为footer。(defcustom org-html-divs '((preamble "div" "preamble") (content "div" "content") (postamble "div" "postamble"))org-html-checkbox-types,指定 checkbox 的样式,默认有 unicde, ascii 和 html 三种我们可以通过
org-html-checkbox-type这个变量来控制导出时选择哪一种样式,默认是ascii,若使用 unicde 那将会使用 ☐ 和 ☑ 代替[ ]和[X]。(defconst org-html-checkbox-types '((unicode . ((on . "☑") (off . "☐") (trans . "☐"))) (ascii . ((on . "<code>[X]</code>") (off . "<code>[ ]</code>") (trans . "<code>[-]</code>"))) (html . ((on . "<input type='checkbox' checked='checked' />") (off . "<input type='checkbox' />") (trans . "<input type='checkbox' />")))) ...) (defcustom org-html-checkbox-type 'ascii ...)org-html-mathjax-options,对 mathjax 的相关设定,具体配置可以参考代码注释与之相关的模板是
org-html-mathjax-template,配置同样参考代码。我会在随后的文章中对 MathJax 和 Katex 做一点简单的介绍。org-html-postamble-format,默认的 postamble 模板,提供了作者,日期,创建工具,HTML 验证链接信息(defcustom org-html-postamble-format '(("en" "<p class=\"author\">Author: %a (%e)</p> <p class=\"date\">Date: %d</p> <p class=\"creator\">%c</p> <p class=\"validation\">%v</p>")) ...)org-html-validation-link,用于验证 HTML 的页面,就是 W3C 的 Validator如果你使用 org 生成的 HTML 去验证能得到一堆 warnings(笑),其中的一个原因是
<meta>这样的自闭合标签最后加了/,而 HTML5 中是不要求标签最后加/的。如果后面有选项可以考虑将它去掉,不过无伤大雅就是了。org-html-creator-string,创建工具名,包含 Emacs 和 Org 信息(defcustom org-html-creator-string (format "<a href=\"https://www.gnu.org/software/emacs/\">Emacs</a> %s (<a href=\"https://orgmode.org\">Org</a> mode %s)" emacs-version (if (fboundp 'org-version) (org-version) "unknown version")) ...)org-html-viewport,和meta viewport相关的设定我会在后面介绍 CSS 文章中介绍这个设定。
(defcustom org-html-viewport '((width "device-width") (initial-scale "1") (minimum-scale "") (maximum-scale "") (user-scalable ""))org-html-klipsify-src,是否使用 klipse 功能,默认关闭Klipse is a JavaScript plugin for embedding interactive code snippets in tech blogs. See examples at https://blog.klipse.tech/
Technically, Klipse is a small piece of JavaScript code that evaluates code snippets in the browser and it is pluggable on any web page.
klipse 似乎是一个浏览器中的运行环境,允许运行多种语言的代码,比如 JavaScript,Ruby,PHP,Clojure 等。根据 org-html 中的代码,这个功能是在 9.1 版本中引入的,但我在 Org Manual 中没有找到对它的说明。
从 200 行到 1600 行左右大概就是所有的 defcustom 了。下面让我们来看看 ox-html 是如何处理 org 文本中的元素的。
这一部分我只是对我比较关心的一些元素进行一些介绍。想要了解完整的导出过程和导出的格式,我们还是得看代码。
ox-html 中使用 org-html--wrap-image 来为图片添加 wrapper。对于非 HTML5 的情况,我们插入类似 [[./1.png]] 的图片会导出得到 div 包裹的 img 标签:
[[./1.jpg]]

<div id="org7ab28fb" class="figure">
<p><img src="./1.jpg" alt="1.jpg" /></p>
</div>

#+CAPTION: a jpg
[[./1.jpg]]

<div id="orgcf2cd09" class="figure">
<p><img src="./1.jpg" alt="1.jpg" />
</p>
<p><span class="figure-number">Figure 1: </span>a jpg</p>
</div>
对于 HTML5 且开启了 html5-fancy 的情况,ox-html 会生成带 <figure> 的 img ,如果有 CAPTION 还会有 figcatipion 标签:
#+HTML_DOCTYPE: html5
#+OPTIONS: html5-fancy:t

#+CAPTION: hello world
[[./1.jpg]]

<figure id="orga4f4578">
<img src="./1.jpg" alt="1.jpg">

<figcaption><span class="figure-number">Figure 1: </span>hello world</figcaption>
</figure>
整个 org-html--wrap-image 的实现如下:
(defun org-html--wrap-image (contents info &optional caption label)
  "Wrap CONTENTS string within an appropriate environment for images.
INFO is a plist used as a communication channel.  When optional
arguments CAPTION and LABEL are given, use them for caption and
\"id\" attribute."
  (let ((html5-fancy (org-html--html5-fancy-p info)))
    (format (if html5-fancy "\n<figure%s>\n%s%s\n</figure>"
	      "\n<div%s class=\"figure\">\n%s%s\n</div>")
	    ;; ID.
	    (if (org-string-nw-p label) (format " id=\"%s\"" label) "")
	    ;; Contents.
	    (if html5-fancy contents (format "<p>%s</p>" contents))
	    ;; Caption.
	    (if (not (org-string-nw-p caption)) ""
	      (format (if html5-fancy "\n<figcaption>%s</figcaption>"
			"\n<p>%s</p>")
		      caption)))))
org-html--format-image 是用来生成 img 标签的函数,这个函数没什么需要改的。它为 svg 图片添加了额外的类 org-svg ,给 svg 图片提供了更多选择。
ox-html 使用 org-html--build-meta-entry 来构建 <meta> ,这个函数功能上没啥问题,但 meta 是自闭合标签,在 W3C 的验证网站中以下内容会报 warning:
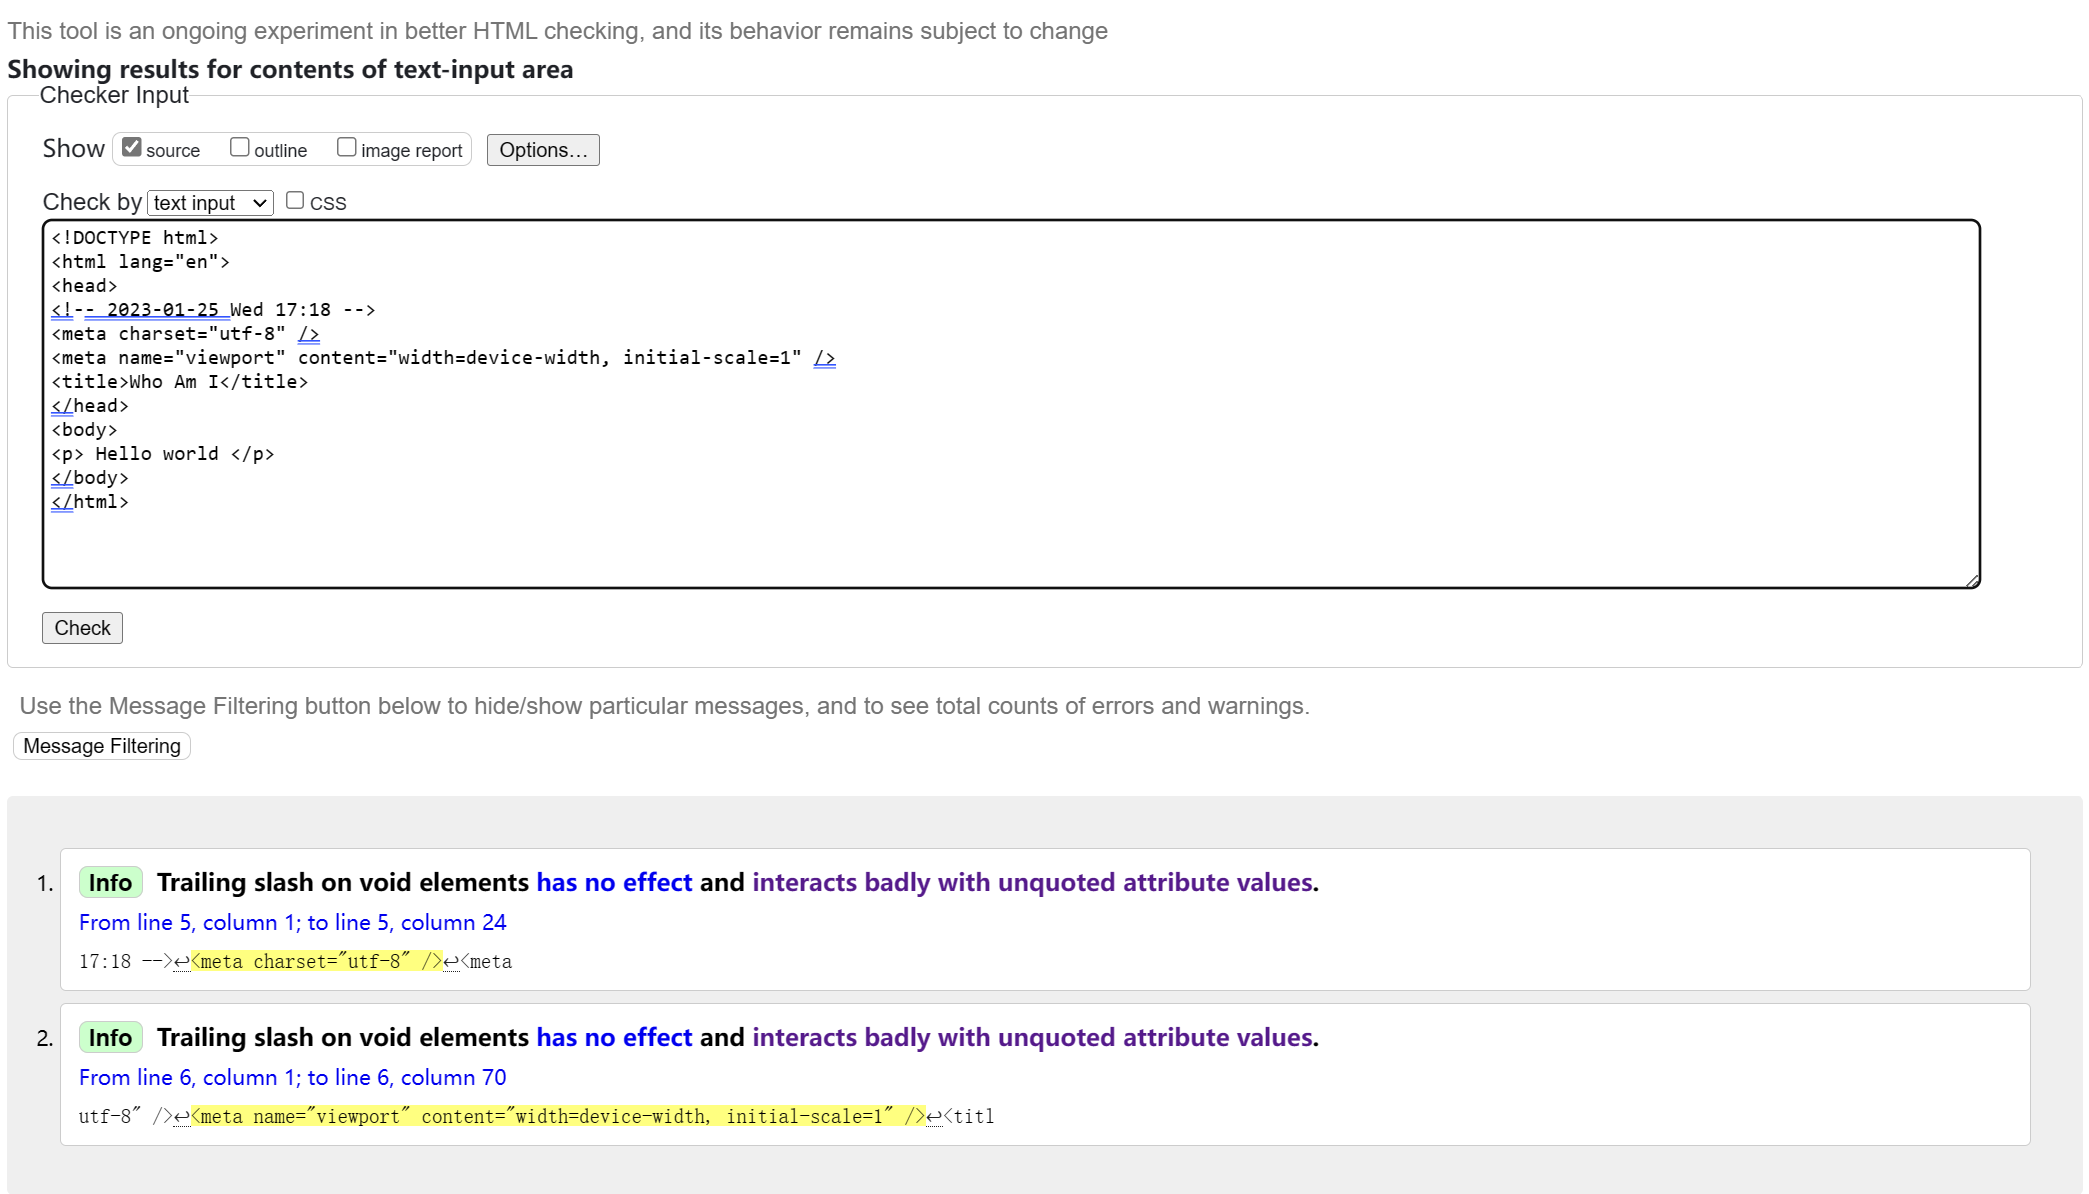
这是因为 HTML5 中不推荐在自闭合标签中使用 / ,虽然标准允许我们这样做就是了。以下是 org-html--build-meta-entry 的实现:
(defun org-html--build-meta-entry
(label identity &optional content-format &rest content-formatters)
(concat "<meta "
(format "%s=\"%s" label identity)
(when content-format
(concat "\" content=\""
(replace-regexp-in-string
"\"" """
(org-html-encode-plain-text
(if content-formatters
(apply #'format content-format content-formatters)
content-format)))))
"\" />\n"))
根据实现,我们可以为其添加 :filter-return advice 来去掉最后的 / :
(defun ad-org-html-meta-entry (st)
  (let ((len (length st)))
    (concat (substring st nil (- len 4))
	      ">\n")))

(advice-add 'org-html--build-meta-entry :filter-return 'ad-org-html-meta-entry)
;;(advice-remove 'org-html--build-meta-entry 'ad-org-html-meta-entry)
现在生成的 meta 标签最后就没有 / 了。具体的 meta tag 生成可以看 org-html--build-meta-info 函数。
org-html-template 用来生成整个 HTML 文件的字符串,我们可以根据它的内容来了解整个文档的结构。
首先是文档内容,如果是 HTML5 的话那就是 <!DOCTYPE html> :
(org-html-doctype info)
在它下面的是 <html> 和 <head> 标签,以及 head 里面的内容:
"<head>\n"
(org-html--build-meta-info info)
(org-html--build-head info)
(org-html--build-mathjax-config info)
"</head>\n"
接着是 <body> 的开头,可见 HTML_LINK_HOME 和 HTML_LINK_UP 位于最前,接着就是 preamble:
"<body>\n"
(let ((link-up (org-trim (plist-get info :html-link-up)))
	(link-home (org-trim (plist-get info :html-link-home))))
  (unless (and (string= link-up "") (string= link-home ""))
    (format (plist-get info :html-home/up-format)
	      (or link-up link-home)
	      (or link-home link-up))))
;; Preamble.
(org-html--build-pre/postamble 'preamble info)
在 preamble 之后就是文章的标题,如果我们使用了 HTML5,那么标题将会使用 header 包裹,而且可以使用副标题:
;; Document title.
(when (plist-get info :with-title)
  (let ((title (and (plist-get info :with-title)
		      (plist-get info :title)))
	  (subtitle (plist-get info :subtitle))
	  (html5-fancy (org-html--html5-fancy-p info)))
    (when title
	(format
	 (if html5-fancy
	     "<header>\n<h1 class=\"title\">%s</h1>\n%s</header>"
	   "<h1 class=\"title\">%s%s</h1>\n")
	 (org-export-data title info)
	 (if subtitle
	     (format
	      (if html5-fancy
		  "<p class=\"subtitle\" role=\"doc-subtitle\">%s</p>\n"
		(concat "\n" (org-html-close-tag "br" nil info) "\n"
			"<span class=\"subtitle\">%s</span>\n"))
	      (org-export-data subtitle info))
	   "")))))
在此之后就是文章的主要内容 contents ,结束后该函数根据 org-html-divs 选择 contents 的闭合标签,默认情况是 </div> :
contents
(format "</%s>\n" (nth 1 (assq 'content (plist-get info :html-divs))))
在这之后就是 postamble,如果我们不使用 klipse 的话就是 </body> 和 </html> 了:
;; Postamble.
(org-html--build-pre/postamble 'postamble info)
;; Possibly use the Klipse library live code blocks.
(when (plist-get info :html-klipsify-src)
  (concat "<script>" (plist-get info :html-klipse-selection-script)
	    "</script><script src=\""
	    org-html-klipse-js
	    "\"></script><link rel=\"stylesheet\" type=\"text/css\" href=\""
	    org-html-klipse-css "\"/>"))
;; Closing document.
"</body>\n</html>"
就这样看的话,整个 HTML 导出内容还是挺清晰的。接下来我们当然也可以把 ox-html 的转换函数介绍一遍,不过我感觉不是很有必要,我现在还没碰到必须要通过修改这些函数才能修改的东西。
关于 org publish 的使用说明网上已经有很多文章了,所以这一部分我没必要写的很长。我不会向网上那样在列表中列很多选项,真正和 publish 系统相关的东西并不多,整个 publish 过程可以简单理解为根据源文件生成一些东西,然后移动到另一个地方。你甚至可以把它理解为 make,我们要做的就是在 org-publish-project-alist 这个变量中配置项目信息。
如文档所述, org-publish-project-alist 就是一个 alist,里面存储了项目信息。它的格式大致如下:
'(("pj1"
   :base-directory "C:\\Users\\yy\\folder1"
   :base-extension "org"
   :publishing-directory "C:\\Users\\yy\\folder2"
   :publishing-function org-html-publish-to-html)
  ("pj2"
   :base-directory "C:\\Users\\yy\\folder1"
   :base-extension "png"
   :publishing-directory "C:\\Users\\yy\\folder2"
   :publishing-function org-publish-attachment
   :recursive t)
  ("main-pj"
   :components ("pj1" "pj2")))
表中的每一项代表一个项目,每个项目由项目名和属性组成。注意最后一个项目是由前两个组合而成的项目。当我们对它进行 publish 操作时,它的子项目都会进行 publish。
对于非组合项目来说真正重要的属性只有几项,比如 :base-directory 指定项目的源目录, :publishing-directory 指定项目的导出目录, :base-extension 指定文件扩展名(不需要点), :recursive 指定是否递归查找需要发布的文件, :publishing-function 指定导出使用的函数,导出 HTML 就用 org-html-publish-to-html ,只是复制文件就用 org-publish-attachment 。
也许你在其他的文章中看到了成吨的导出属性,这些完全可以放在一个文件里,然后通过 SETUPFILE 引入到你想要导出的文件中,这样就不用在 org-publish-project-alist 中写上很多了。如果你在 alist 中指定了一些选项,它们会覆盖掉原先的变量值,但是会被 in-buffer setting 也就是文件内的设定覆盖掉。关于 HTML 的导出选项可以参考 14.1.5 Options for the exporters。
除了上面的常用属性外,这里我根据文档补全所有的属性:
:preparation-function,执行发布前运行的函数或函数列表:completion-function,执行发布后执行的函数或函数列表:exclude,用于排除不发布文件的正则,即使它们是:base-extension匹配的文件:include,要包括的文件的正则,即使它们被:exclude排除了
关于 :base-extension 和 :recursive 我再做一些补充说明。 :base-extension 就是一个匹配扩展名的正则,除了单个后缀外我们还可以使用多个,比如 :base-extension "jpg\\|png\\|gif\\|webp" 。 :recursive 是递归发布,它会对得到的文件 保持 源目录格式,比如:
- src
  - f1
    - 1.org
  - f2
    - 1.org
  - f3
    - 2.org
    - 3.org

===========

- dst
  - f1
    - 1.html
  - f2
    - 1.html
  - f3
    - 2.html
    - 3.html
最后提一下 org publish 的时间戳功能。Org 会使用时间戳来追踪文件是否被修改,我们调用一些发布指令时只会对修改过的文件进行发布,这有点像 make。时间戳记录在用户目录下的 .org-timestamps 目录的 org.cache 文件中,我们可以通过修改变量 org-publish-use-timestamps-flag 来关闭这个功能。如果项目中的文件使用 INCLUDE 或 SETUPFILE 引用了其他文件,而其他文件又不在项目中的话,关闭这个选项可能是有必要的。
Org 提供了四条指令供我们使用,分别是:
C-c C-e P x,org-publish,弹出选项来选择项目进行发布C-c C-e P p,发布包含当前所在文件的项目C-c C-e P f,仅发布当前文件C-c C-e P a,发布所有的项目
虽说上面建议我们在必要时关闭时间戳功能,但这也并不意味着我们每次都需要修改 org-publish-use-timestamps-flag 这个变量,在导出界面中有一个 force 选项,我们可以通过 C-f 切换它的状态,若 force 启用则忽略掉时间戳强制发布:

顾名思义,sitemap 就是网站地图,它里面包含了某个项目中的全部发布文件的链接,这样通过 sitemap 页面就可以访问全部的项目页面。这里我们先介绍一些属性选项,然后再简单说一下调整方法。
:auto-sitemap,自动生成 sitemap ,选项为非nil时会在调用org-publish-current-project或org-publish- all时生成 sitemap:sitemap-filename,sitemap 生成文件名,默认为sitemap.org,通过它生成的 HTML 文件名为sitemap.html:sitemap-title,sitemap 文件的标题,默认为文件名:sitemap-format-entry,sitemap 中实体的格式,后文介绍:sitemap-function,sitemap 生成函数,后文介绍:sitemap-sort-folders,文件夹在 sitemap 中出现的位置,后文介绍:sitemap-sort-files,文件在 sitemap 中的排序,后文介绍:sitemap-ignore-case,排序是否忽略大小写,默认为nil:sitemap-file-entry-format,sitemap 中文件实体的格式,后文介绍:sitemap-date-format,日期格式化字符串,后文介绍
原本我准备直接介绍一下选项就完事,但我在 org-publish-site-file-entry-format 的 *help* 中看到它是个 obsolete 选项,这也许说明文档的内容有些老旧了,我们还是看看 org publish 中关于 sitemap 的实现吧。 ox-publish.el 只有千行左右,考虑到我们只关注 sitemap 部分,看看代码也不是什么难事。
sitemap 的生成是通过 org-publish-sitemap 函数完成的,当 :auto-sitemap 为非 nil 时,它在 org-publish-projects 中被调用。可以看到 sitemap.org 的生成在所有文件的发布之前,这样 sitemap.org 也会通过后端得到导出文件:
;; org-publish-projects snippet
(when (org-publish-property :auto-sitemap project)
  (let ((sitemap-filename
	   (or (org-publish-property :sitemap-filename project)
	       "sitemap.org")))
    (org-publish-sitemap project sitemap-filename)))
;; Publish all files from PROJECT except "theindex.org".  Its
;; publishing will be deferred until "theindex.inc" is
;; populated.
现在,让我们来看一看 org-publish-sitemap ,我们可以看到有一个 :sitemap-style 选项没有在文档中列出来,它的值默认是 tree ,表示在 sitemap 中保持目录结构,我们也可以将它设为 list :
(style (or (org-publish-property :sitemap-style project)
	     'tree))
这样生成的 sitemap 就没有目录结构了,下图是 tree 与 list 的结果对比:
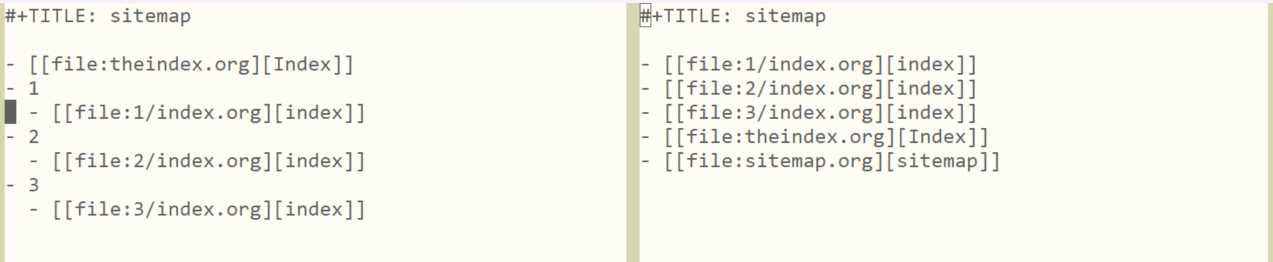
注意到上图中的页面格式了吗? [[file:filepath][filename]] ,我们可以使用 :sitemap-format-entry 来修改这个默认格式,以此来做到加上格式或修改名字等操作,默认的函数如下:
(defun org-publish-sitemap-default-entry (entry style project)
  "Default format for site map ENTRY, as a string.
ENTRY is a file name.  STYLE is the style of the sitemap.
PROJECT is the current project."
  (cond ((not (directory-name-p entry))
	 (format "[[file:%s][%s]]"
		 entry
		 (org-publish-find-title entry project)))
	((eq style 'tree)
	 ;; Return only last subdir.
	 (file-name-nondirectory (directory-file-name entry)))
	(t entry)))
这个函数接受 3 个参数,分别是作为文件名的 entry ,sitemap 导出样式 style 和 project list。我们可以根据这些信息编写出自己的格式,由于需求多种多样,这里我就不演示如何编写了。
:sitemap-sort-folders 和 :sitemap-sort-files 是两个用于排序的选项,它们被用于叫做 sort-predicate 的内部函数中。 sort-files 首先被用来判断文件的顺序,它提供了三种排序,分别是字母顺序,日期顺序和日期逆序。在根据文件名判断后,如果指定 :sitemap-sort-folders 为 first 或 last ,那么还会根据目录进行排序,若为 first 则目录优先,否则目录在后面:
;; org-publish-sitemap snippet
;; Directory-wise wins:
(when (memq sort-folders '(first last))
  ;; a is directory, b not:
  (cond
   ((and (file-directory-p a) (not (file-directory-p b)))
    (setq retval (eq sort-folders 'first)))
   ;; a is not a directory, but b is:
   ((and (not (file-directory-p a)) (file-directory-p b))
    (setq retval (eq sort-folders 'last)))))
:sitemap-function 是用于整个发布过程的函数,它的默认函数是 org-publish-sitemap-default-entry ,我们可以参考它来根据需要编写自己的函数。
我没有在文件中找到 :sitemap-date-format 的定义,可能它已经被废弃了,而且不像 :sitemap-file-entry-format ,它是完全消失了(笑)。
总结一下吧,参考了文档和代码,我们有以下选项可用:
:auto-sitemap:sitemap-filename:sitemap-title:sitemap-style:sitemap-format-entry:sitemap-function:sitemap-sort-folders:sitemap-sort-files:sitemap-ignore-case
实际上我们完全可以使用 babel 在文件中嵌入 elisp 代码,在导出时调用生成输出到当前文件的内容,以此作为 sitemap,这样甚至都不需要读 sitemap 相关文档。不过 ox-publish 中的一些通用函数还是很好用的,比如 org-publish-find-property ,在编写自己的函数时可以借鉴一下。
这里附上使用 sitemap 的 alist :
(setq org-publish-project-alist
	'(("org"
	   :base-directory "C:\\Users\\26633\\Desktop\\org\\in"
	   :base-extension "org"
	   :publishing-directory "C:\\Users\\26633\\Desktop\\org\\out"
	   :publishing-function org-html-publish-to-html
	   :recursive t
	   :auto-sitemap t
	   :sitemap-title "sitemap"
	   :sitemap-style list
	   :sitemap-filename "newsite")))
相比于 sitemap,这个功能就相当简陋了,我们只能在 org-publish-project-alist 中指定 :makeindex 来生成一个叫做 theindex.org 的文件,它里面会包含在文件内指定了 INDEX 属性的文件,然后按照字母顺序生成到 theindex.inc 中。 theindex.org 只是包含了一行 #+INCLUDE theindex.inc 而已。
我感觉这个功能用处不大。如果你要尝试这个功能的话,你可以在 alist 中指定 :makeindex t ,然后在你的项目 org 文件中写上 #+INDEX: a , #+INDEX: b 等属性,然后观察生成的 theindex.org 文件和 theindex.inc 文件即可。
本文简单介绍了 ox-html 和 ox-publish 的一些功能,但是不是很全,只是对我感兴趣的部分做了个笔记而已。在下一篇文章中,我会简单介绍 HTML5 是什么,以及如何使用 ox-html 来导出 HTML5 风格的 HTML 文件。